First, Let us know why do we need to cook custom boot,img for redmi note 3!
In redmi note 3 Stock ROM's boot.img, there is a script to check whether recovery mode of the ROM is official stock recovery or not. So If you actually flash a custom recovery to your Kenzo, while booting the OS, it will get detected by the OS, and will be replaced by the stock recovery.
So in order to prevent this process, we rebuild the boot.img of the stock ROM by removing the verification script. The same is explained here.
All thanks to feds64 Dev from MIUI official forum. Without whom this amazing tool would be dream, probably!
Requirements:
- Android Image kitchen (credits- feds64 from MIUI forum) - "Download here".
- Your Stock ROM archive (.tar.gz fastboot ROM file)
- A Windows Based PC (windows 7 or higher)
Procedure:
Step 1: Extract the Android kitchen package to somewhere of your choice and Open the folders until you find the required files for packing unpacking.
Step 2: Extract the Stock ROM archive to somewhere of your choice. Open the images folder in the extracted folder, and find 'boot.img' inside it. Copy this file and paste it to the Android kitchen Folder where you found those files above (in step 1). See Image below.
Step 3: Drag the 'boot.img' file you just copied here, to the 'unpackimg.bat' file which can be found in the same folder. (See image below)
Step 4: Unpacking process will take place in a window shown like below, press any key after all processing is done.
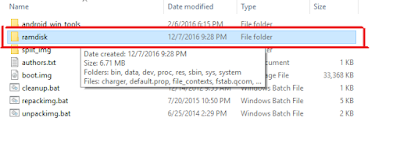
Step 5: After unpacking is complete, you will see some new folders formed in the Android kitchen directory. Open the folder named 'ramdisk'.
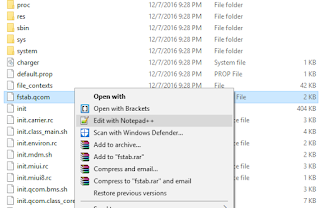
Step 6: Find a file 'fstab.qcom' inside this folder. Right click on it, and select Edit option (may be through notepad++ or inbuilt windows notepad)
Step 7: There will be several lines of scripts in this file. Find for a text ,verify in this file. (including comma).
Step 8: Remove that part. Make sure you remove only ,verify (including commas) and nothing else. Now save it.
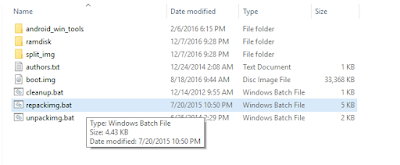
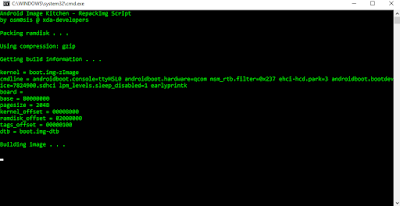
Step 9: Now close the notepad file. Find a file 'repackimg.bat' inside Android kitchen package. Run it by double clicking. You will see something like this, after which you get a repacked boot image, named 'image-new.img'.
Repacking screen will look like,
Step 10: Delete the old boot.img from that folder (the original one). Rename the rebuilt image file to 'boot.img'.
Step 11: Copy this file. and paste it in Stock ROM's images folder ( I mean overwrite with the original one). Keep a backup of original one for safety.
Now flash the ROM with this custom boot.img. Custom recoveries must survive overwriting.
That's it.
Queries? In to the comment box below.


Share your views about this article!