

In this article, I'll be explaining steps involved in Google play Publishing, right from Developer console account creation, till publishing. Let's begin.
1. Creating a Developer Console account.
- You will need a Play store developer console account for publishing apps. This is a one time purchase from Google. You will have to pay $25 (US Dollar) to Google to create a developer account for your Gmail ID.
- Just visit this website - Signup for Google Play Developer Account
- Accept their 'Terms & conditions' and click 'Continue to payment' as shown in the picture.

- Payment method accepted are Debit/Credit cards with international transaction support. (In India, most bank's Debit cards won't work as it isn't eligible for International fund transfers. However, Some Debit cards of Newer banks like ICICI, AXIS might work. I personally used CITI Bank credit card for purchase)
- After the payment is complete, You'll be asked to Enter some information about yourself. Fill all those and complete registration.
- Now you will be taken to Developer console Home screen. This is how it may look like.


- Once your account creation is successful, Now it's the time for publishing your first application.
- Click on 'Create Application' at the right top of the Developer console home screen (as shown in picture above).
- You will be asked about the Language of the application, and it's Name. Fill it. Then click on 'Create'.

- You will be taken to a new page to fill some information.

- In the left pane, Click on 'APK' and you'll see a screen like this.

- Click on 'Upload your first APK to production'. You will be asked to browse your signed apk file.


- Browse your apk file which you want to publish.

- It may take some time to upload your apk and process it.

- After uploading is completed, you'll see a screen like this. Now that app is uploaded, it's time for filling other information.


Store listing is often considered as 'SEO' of Play store. SEO is nothing but Search Engine Optimization. The more effective you write the store listing, the more the chances that your app is listed in the search of Play store on specific keywords when users search. So Be careful to enter this part.
- Click on the 'Store listing' section of Left m
This part usually consists of
- A Brief description of your app.
- A detailed description of your app.
- Developer contact info
- Screenshots and App icons
- Privacy policy of app
- Content rating.
- Enter a Brief description, detailed description for your app. Brief description shall contain the idea of what your app is about. Detailed description shall contain the detailed information about what all features your app has. Enter these details in a standard way since this is going to effect the store listing for your app. Use More Keywords for better SEO.


4. Adding Screenshots of your app
Screenshots are often best used for describing the layout and design of your app. User can get impressed by seeing the Interface of your app. So adding screenshot can give your app a grand shot.
There are certain constraints for this.
- A High Resolution app icon for displaying in the play store. Minimum dimension 512px.
- You must include at least 2 general screenshots of your app. Minimum dimension 320px, maximum dimension 3840px.
- The maximum dimension of your screenshot can't be more than twice as long as the minimum dimension.
- Minimum 1 screenshot of each 7 inch and 10 inch tablets must be included.
- A Featured graphic to serve as a banner for your app while viewing the app in mobile play store app.
- If you are supporting Android TV, at least 1 screenshot of it must be included.
- If you are supporting Android Wear, at least 1 screenshot of it must be included.
So do all these screenshot uploads.
Screenshots, Icon, Featured graphic

Screenshot for tablet (both 7 and 10 inch)

- If you have any introductory video of your app in YouTube, you can include the link of it.
- Next, Select the category for your app. (includes App type, Category, content rating) select all of them accordingly.


Add these to let users to contact you in case they want to discuss any information with the developer. You can also add your Website link here. You can also add a link to a page containing the 'privacy policy' for your app.

6. Content rating
This is the rating of your app usability. This tells who can use your app. You can restrict children from installing this if your app contains adult information.
Select 'Content rating' pane from left menu.

- Click on 'Continue' to add a content rating badge for your application.
- You will see a screen where you are requested to enter your Email address and to confirm it. Do it.

- Select Your app category accordingly now. Select from the defined set of categories in that screen. See image.

- Once category is selected, You will be asked some questions about your app. Read them and answer 'Yes' or 'No' accordingly.

- After all the questions are answered, Click on 'Calculate rating'.

- Review the rating they just calculated and click on 'Apply rating' button.

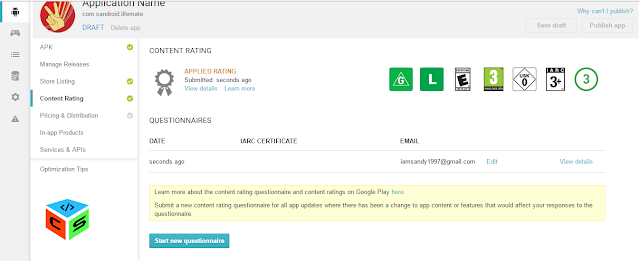
- You will see a content raring badge like this.
- This part is done. Now proceed to Pricing and distribution.


This is the phase of setting a price to your app or letting it for free installation. But remember that once selected and published decision about paid or free, can not be changed again in future.
- Select accordingly. If you want to release this as a paid software, you will need to create a Merchant account for your Developer account. You will be guided with on screen instructions.
- If you are releasing it for free, Select 'Free' option.
- Also select the Countries in which you want to release your application. See image

- Chose whether your app displays Advertisements by any third party ad servers.

- Next, Abide by the US rules of Uploading and exporting of an application, and also check whether your app meets content guidelines of Google Play publishing policy. (Both Mandatory)

- Click on 'Save Draft' option to save all the entered information.
- That's it. All the basic information is submitted now. Time to publish.
- Check whether all those mentioned in the image below are completed (shown by a green tick mark).

- Before publishing, make sure all information are correct. If yes, then Click on 'Publish app' which is found at the right top of the screen.
- That's it. Now it's the time to wait for approval by the Google Play team.

- This may take 5-6 hours. After which, you can find your app in the google play search.


This is the detailed instruction of App publishing in Google play store. Drop a Comment below if you have any queries regarding the same.
All the best!

4 comments
Write commentsThe store has been named as Google Play due to its inclination towards wholesome entertainment and fun.
Replydownloadshareitapp.com
he answer is most likely not, as you will be competing against others who have high tech pr firms with a lot of experience. To beat them at their own game would be a near impossibility. Darknet Proxy
ReplyIt is not possible for a technician to come on time always. You may have to wait for two or three days and this wait can delay your work. Therefore, it is better to seek help from online professionals as they can provide support without any delay. The Best in Tech
ReplyShare your views about this article!